- Step 1: Install required packages
- Step 2: Discover the domain
- Step 3: Enable home directories
- Step 4: (Optional) Allow short logins
- Step 5: Test login
- Step 6: Restrict who can login
- Step 7: Add group to sudoers
The linux version used is Ubuntu 24.04.3 LTS. Make sure you have configured proper name resolution between DCs and Linux machines.
Configure the Ubuntu network settings by creating the following file:
sudo nano /etc/netplan/01-netcfg.yaml
Inside, your YAML configuration should look like this:
network:
  version: 2
  renderer: networkd
  ethernets:
    enp0s3:
     dhcp4: no
     addresses:
       - 192.168.1.43/24
     gateway4: 192.168.1.1
     nameservers:
       search:
         -  test.lab
       addresses:
         - 192.168.1.42
Step 1: Install required packages
sudo apt install realmd sssd sssd-tools adcli samba-common-bin oddjob oddjob-mkhomedir packagekit
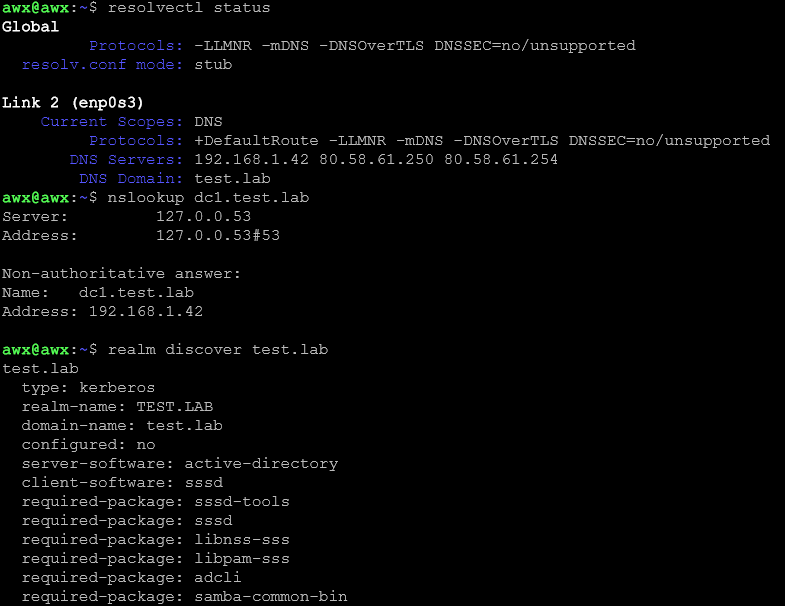
Step 2: Discover the domain
realm discover example.com
Next, we will run the following commands to join and verify:
sudo realm join -U "Administrator" test.lab realm list
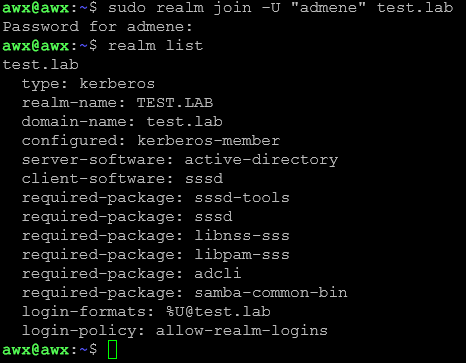
Also test a user lookup:
id "Administrator@test.lab"

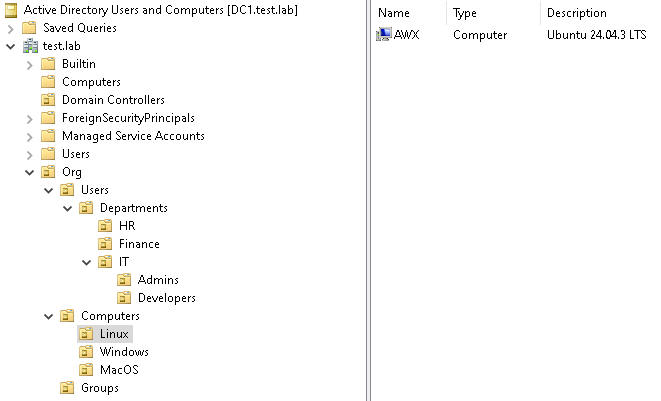
At this point the computer object should have been created in your Active Directory:
Step 3: Enable home directories
To auto-create home directories on first login:
sudo pam-auth-update --enable mkhomedir
Step 4: (Optional) Allow short logins
By default, you must login as user@test.lab. The config looks like this:
[sssd]
domains = test.lab
config_file_version = 2
services = nss, pam

[domain/test.lab]
default_shell = /bin/bash
krb5_store_password_if_offline = True
cache_credentials = True
krb5_realm = TEST.LAB
realmd_tags = manages-system joined-with-adcli
id_provider = ad
fallback_homedir = /home/%u%d
ad_domain = test.lab
use_fully_qualified_names = True
ldap_id_mapping = True
access_provider = simple
simple_allow_groups = Linux Admins@test.lab
To allow just user, edit /etc/sssd/sssd.conf and add:
[domain/test.lab] use_fully_qualified_names = False fallback_homedir = /home/%u default_shell = /bin/bash
Then restart SSSD:
sudo systemctl restart sssd
Step 5: Test login
Try to login using this format:
ssh user@test.lab@localhost

or just:
ssh user@localhost
(if you enabled short names).

Step 6: Restrict who can login
Verify you can “see“ the group:
getent group "Linux Admins@test.lab"
Allow only the “Linux Admins” group:
sudo realm permit -g "Linux Admins@test.lab"
Step 7: Add group to sudoers
Create a dedicated sudoers file (best practice):
sudo visudo -f /etc/sudoers.d/linux-admins
Next add the following:
%Linux\ Admins@test.lab ALL=(ALL) ALL